Setting Up a Svelte Project with Typescript
Nick Scialli
February 14, 2021

Today we’re going to set up a Svelte project with Typescript.
It turns out it’s… really, really easy if we’re willing to use a project template rather than rolling it from scratch. I do think it’s a great exercise to set up a Svelte app from scratch, but ultimately there will be templates out there that help you get up and running faster.
Using a Svelte Starter Template
We’re going to use the degit npm package to copy down the official Svete template. Since we’re too lazy to install degit locally, we can just use npx to execute it.
We are going to copy the contents of the repositry into a project folder called svelte-with-typescript.
npx degit sveltejs/template svelte-with-typescriptConverting our Project to Typescript
By default, this template uses JavaScript. But—they made it super simple to convert to Typescript. How simple? Well they literally have a script in scripts/setupTypeScript.js that does it for you! Let’s cd into our new project directory and run that script.
cd svelte-with-typescript
node scripts/setupTypeScript.js
Finally, let’s install all our dependencies. I like to use yarn, but npm will work just fine.
yarnAnd… that’s it! Like every other experience I have had with Svelte, it just works.
Using Typescript in Our Project
Let’s quickly use some Typescript in our project to show that it works. In our src folder, let’s create a store.ts file with a writable store. This store will contain some details for a user in our application:
src/store.ts
import { writable } from 'svelte/store';
type Store = {
name: string;
age: number;
admin: boolean;
};
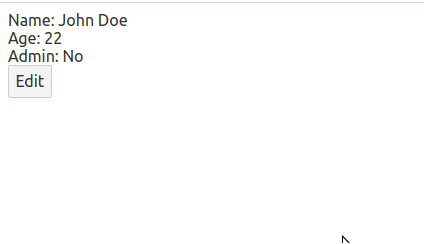
export const store = writable<Store>({
name: 'John Doe',
age: 22,
admin: false,
});And we can edit our src/App.svelte file to be able to edit this store info.
src/App.svelte
<script lang="ts">
  import { store } from "./store";
  let edit: boolean = false;
</script>

<main>
  {#if edit}
    <label for="name">Name:</label>
    <input id="name" type="text" bind:value={$store.name} /><br />
    <label for="age">Age:</label>
    <input id="age" type="number" bind:value={$store.age} /><br />
    <label for="admin">Admin:</label>
    <input id="admin" type="checkbox" bind:checked={$store.admin} />
  {:else}
    Name: {$store.name}<br />
    Age: {$store.age}<br />
    Admin: {$store.admin ? "Yes" : "No"}
  {/if}
</main>

<button on:click={() => (edit = !edit)}>
  {edit ? "Close" : "Edit"}
</button>
Note that the script tag has the lang="ts" attribute! This is necessary if we use any types in our .svelte files.
Running the App in Dev Mode
We can now run our app. Use yarn dev in the terminal.
yarn devThe dev server should now be serving on port 5000. Let’s check it out at http://localhost:5000.
We’re Done Here
Let’s not make this longer than it has to be. Svelte again makes the dev experience very pleasant. Enjoy using Svelte with Typescript!


Nick Scialli is a senior UI engineer at Microsoft.