Your First React Typescript Project: a Todo List App
Nick Scialli
April 24, 2020
Today we’re going to learn how to write a React Typescript application. As is tradition with any new front-end language or framework, we’re going to learn how to write a to-do list app! Despite to-do list app tutorials being overdone, I like using it since you can make an apples-to-apples comparison with other frameworks in which you’ve also written the same app.
Other Resources to Accompany this Tutorial
This tutorial has an accompanying github repository! Also, I recorded a three-part YouTube tutorial series if that’s your preferred tutorial consumption method. Both can be found below:
Getting Your Environment Setup
To get started, there are a couple prerequisites. First, you’ll need to install Node if you don’t have it yet.
Make sure you have node installed by typing node -v into your command line. You should see a version display. My version is currently 10.15.2, but yours might be different.
node -vWe could use npm to manage our node packages, but I prefer yarn. Therefore, I’m going to use npm to install yarn globally: npm i -g yarn
npm i -g yarnIf this works, you should be able to see your yarn version by typing yarn -v. Again, your version may be different than mine:
yarn -vNow we’re ready to get going!
Bootstrapping with create-react-app
To save us the setup headache and get us moving faster, we can bootstrap our app with create-react-app! I’ve used React in production a lot, and I still generally start out with create-react-app as a template to get going.
Let’s use yarn to create a react. We’ll need to make sure to specify that we want to use Typescript and that we want to name our app todo-list:
yarn create react-app todo-list --template typescriptYou should see a bunch of downloading happening and finally instructions to cd into your new directory and start coding. Let’s go!
Exploring the Bootstrapped App
Make sure you’re in the new todo-list directory. Your should see the following folders and files. While we’ll be doing most of our work in the src folder, it’s important to understand what everything else does. Here’s a quick rundown:
- node_modules - contains code for the third-party libraries used by your app.
- public - contains the assets that’ll help build your final app, including things like
index.htmland your app’s favicon. - src - contains the source code for the app you’ll be working with most.
- .gitignore - specifies which files to ignore for source control.
- package.json - contains your app’s configuration, including things like dependencies and scripts.
- README.md - starts with information about create-react-app, but in a real application you should describe the app itself.
- tsconfig.json - contains configuration for the typescript compiler.
- yarn.lock - contains the exact version for all project dependencies. Should be checked into version control.
Start the app
Great, that’s enough looking around. Let’s start the app by running yarn start in the command prompt.
Navigate to http://localhost:3000 and you should see our app in all its starter glory:

Note: As part of the deal with create-react-app, our app will hot reload whenever we make changes! That means we can generally leave yarn start running in the console and we won’t have to restart it. Realistically, we’ll find that our app occasionally does require us to restart the server when the typescript compiler barfs or we add or remove files.
Stripping Down to “Hello World”
This is cool and all, but we want to start relatively fresh with this tutorial. Therefore, we’re going to remove a bunch of files from the src folder and modify some files.
Remove files
cd src
rm App.css App.test.tsx index.css logo.svg serviceWorker.ts setupTests.ts
The only files left should be App.tsx, index.tsx, and react-app-env.d.ts.
Edit code
Let’s first hop into index.tsx and remove references to index.css and the service worker. Your file should end up looking like this:
import React from 'react';
import ReactDOM from 'react-dom';
import App from './App';

ReactDOM.render(
  <React.StrictMode>
    <App />
  </React.StrictMode>,
  document.getElementById('root')
);
Next, open up App.tsx and delete references to the logo and CSS file. Also, delete everything from the App function and instead replace it with returning a React fragment with the text “Hello World” in it.
import React from 'react';

function App() {
  return <>Hello World</>;
}

export default App;
Now check out our app!

A Quick Mock of Our Todo List Application
One nice aspect of React is your component structure can often closely follow your design. In our todo list application example, we can pretent we’re given the following mock:

Importantly, we can see our app has a TodoListItem, a TodoList, and an AddTodoForm. Ultimately, our app structure will end up mirroring this.
Creating a Todo List Item
Let’s get to work! Create a new file called TodoListItem.tsx in your src folder.
Let’s write a basic React component that has placeholder content inside a list item:
import React from 'react';

export const TodoListItem = () => {
  return <li>content</li>;
};
Cool. Now, let’s Add some props. This is where we’ll start getting typescripty! Our TodoListItem component will at least take a todo item as a prop. That todo item will have text property, which will be a string, and a complete property, which will be a boolean.
Once we’ve defined our props, we can declare our TodoListItem as a functional component (React.FC) and then pass our Props as a generic.
import React from 'react';

interface Todo {
  text: string;
  complete: boolean;
}

interface Props {
  todo: Todo;
}

export const TodoListItem: React.FC<Props> = (props) => {
  return <li>content</li>;
};
Next, let’s actually use the props that we’ve described. Let’s put a checkbox in each list item. The checkbox will be checked when todo.complete is true. A label will be populated with our todo.text.
Additionally, let’s put a strike-through our todo item if it’s complete. We can do this with the style attribute.
import React from 'react';

interface Todo {
  text: string;
  complete: boolean;
}

interface Props {
  todo: Todo;
}

export const TodoListItem: React.FC<Props> = ({ todo }) => {
  return (
    <li>
      <label
        style={{ textDecoration: todo.complete ? 'line-through' : undefined }}
      >
        <input type="checkbox" checked={todo.complete} /> {todo.text}
      </label>
    </li>
  );
};
Creating a Type Declaration File
While we could keep Todo declared in this file, it’s going to be used throughout the app. We can either export it here and import it everywhere else we need it throughout the app, or we can create a type declaration file. Let’s call this types.d.ts and put it in our src folder. What’s nice about a *.d.ts file is our compiler will recognize the types in there as global to the project and we won’t need to explicitly import or export them.
types.d.ts
interface Todo {
  text: string;
  complete: boolean;
}
Now we can remove the Todo interface declared in TodoListItem.tsx and everything should still work just fine.
Including The TodoListItem in our App
Of course we’ve only written a component so far; we still need to include it in our App. let’s do that now. Go to App.tsx and import the component.
import React from 'react';
import { TodoListItem } from './TodoListItem';

function App() {
  return (
    <>
      <TodoListItem />
    </>
  );
}

export default App;
You may notice that, if we try to run our app right now, it’ll fail to compile–we defined our TodoListItem as taking a todo prop and we’re not providing it! Let’s change that: we’ll make a Todos array.
We’ll create two items and put them within an unordered list:
import React from 'react';
import { TodoListItem } from './TodoListItem';

const todos: Todo[] = [
  {
    text: 'Walk the dog',
    complete: false,
  },
  {
    text: 'Write app',
    complete: true,
  },
];

function App() {
  return (
    <ul>
      <TodoListItem todo={todos[0]} />
      <TodoListItem todo={todos[1]} />
    </ul>
  );
}

export default App;
Now let’s check out our app in the browser:

Toggling Todos
The next thing we want to do is actually be able to toggle the todo items. We can no longer rely on our todos array, but we’ll rather need some state to manage things. For this, we’ll use the useState React hook in our App.tsx file. We can rename our todos array to initialTodos since it really just represents the initial state.
import React, { useState } from 'react';
import { TodoListItem, Todo } from './TodoListItem';

const initialTodos: Todo[] = [
  {
    text: 'Walk the dog',
    complete: false,
  },
  {
    text: 'Write app',
    complete: true,
  },
];

function App() {
  const [todos, setTodos] = useState(initialTodos);
  return (
    <ul>
      <TodoListItem todo={todos[0]} />
      <TodoListItem todo={todos[1]} />
    </ul>
  );
}

export default App;
We’ll want to be able to toggle todos. We can do this by creating a toggleTodo function in our App.tsx file. The toggleTodo function will take a selected todo and toggle the complete prop for that todo.
Then, we can pass toggleTodo to each TodoListItem.
import React, { useState } from 'react';
import { TodoListItem } from './TodoListItem';

const initialTodos: Todo[] = [
  {
    text: 'Walk the dog',
    complete: false,
  },
  {
    text: 'Write app',
    complete: true,
  },
];

function App() {
  const [todos, setTodos] = useState(initialTodos);

  const toggleTodo = (selectedTodo: Todo) => {
    const newTodos = todos.map((todo) => {
      if (todo === selectedTodo) {
        return {
          ...todo,
          complete: !todo.complete,
        };
      }
      return todo;
    });
    setTodos(newTodos);
  };

  return (
    <ul>
      <TodoListItem todo={todos[0]} toggleTodo={toggleTodo} />
      <TodoListItem todo={todos[1]} toggleTodo={toggleTodo} />
    </ul>
  );
}

export default App;
Our linter is now mad. That’s because toggleTodo is not an expected prop for our TodoListItem. Let’s add it as an expected prop. While we’re at it, let’s declare a ToggleTodo type in our types.d.ts file:
types.d.ts
interface Todo {
  text: string;
  complete: boolean;
}

type ToggleTodo = (selectedTodo: Todo) => void;
Now when we add toggleTodo as a prop for the TodoListItem, let’s execute it in the onClick handler for our input element.
TodoListItem.tsx
import React from 'react';
interface Props {
todo: Todo;
toggleTodo: ToggleTodo;
}
export const TodoListItem: React.FC<Props> = ({ todo, toggleTodo }) => {
return (
<li>
<label
style={{ textDecoration: todo.complete ? 'line-through' : undefined }}
>
<input
type="checkbox"
checked={todo.complete}
onClick={() => {
toggleTodo(todo);
}}
/>{' '}
{todo.text}
</label>
</li>
);
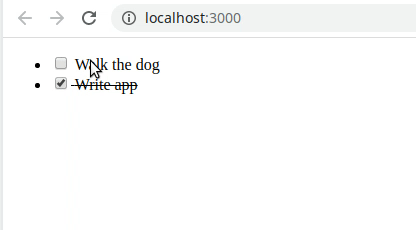
};Let’s open our app and start toggling our todo items. It works!
Creating a TodoList Component
If you recall, our app mock include a TodoList component to contain all our todos.
Let’s create that component. It’s going to have to take the following props:
- List of
todosto map over - The
toggleTodofunction to pass to each todo item.
Importent to note in this component is that we’re mapping over our todos rather than listing them individually. This is obviously a good idea because we could theoretically have any number of todos. Note that, when we iterate over the todos, we pass each TodoListItem a key prop. This is needed by React’s diffing algorithm to reconcile arrays of elements.
TodoList.tsx
import React from 'react';
import { TodoListItem } from './TodoListItem';

interface Props {
  todos: Todo[];
  toggleTodo: ToggleTodo;
}

export const TodoList: React.FC<Props> = ({ todos, toggleTodo }) => {
  return (
    <ul>
      {todos.map((todo) => (
        <TodoListItem key={todo.text} todo={todo} toggleTodo={toggleTodo} />
      ))}
    </ul>
  );
};
Now, we can replace much of the code we had in our App.tsx file with our TodoList. We have to remember to pass the right props to it–although if we forget, the typescript compiler will yell at us, which is great!
App.tsx
import React, { useState } from 'react';
import { TodoList } from './TodoList';

const initialTodos: Todo[] = [
  {
    text: 'Walk the dog',
    complete: false,
  },
  {
    text: 'Write app',
    complete: true,
  },
];

function App() {
  const [todos, setTodos] = useState(initialTodos);

  const toggleTodo = (selectedTodo: Todo) => {
    const newTodos = todos.map((todo) => {
      if (todo === selectedTodo) {
        return {
          ...todo,
          complete: !todo.complete,
        };
      }
      return todo;
    });
    setTodos(newTodos);
  };

  return <TodoList todos={todos} toggleTodo={toggleTodo} />;
}

export default App;
If we open up our app in the browser, we should be able to confirm that everything’s working.
Adding Todo Items
Let’s make a new component called AddTodoForm so we can add todo items. For now, we’ll just make a form that doesn’t do anything and add it to our App.tsx file.
AddTodoForm.tsx
import React from 'react';

export const AddTodoForm: React.FC = () => {
  return (
    <form>
      <input type="text" />
      <button type="submit">Add Todo</button>
    </form>
  );
};
App.tsx
import React, { useState } from 'react';
import { TodoList } from './TodoList';
import { AddTodoForm } from './AddTodoForm';
const initialTodos: Todo[] = [
{
text: 'Walk the dog',
complete: false,
},
{
text: 'Write app',
complete: true,
},
];
function App() {
const [todos, setTodos] = useState(initialTodos);
const toggleTodo = (selectedTodo: Todo) => {
const newTodos = todos.map((todo) => {
if (todo === selectedTodo) {
return {
...todo,
complete: !todo.complete,
};
}
return todo;
});
setTodos(newTodos);
};
return (
<>
<TodoList todos={todos} toggleTodo={toggleTodo} />
<AddTodoForm />
</>
);
}
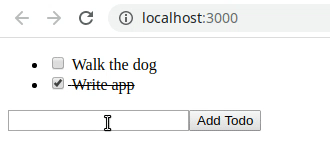
export default App;Now we can see in our browser the form appears. When we try to add a todo and click submit, nothing really happens except the page reloads.

Now, let’s make our form add stuff. First, we can create an addTodo function in our App.tsx file that will eventually be passed down to our form. We can declare the type AddTodo in our types.d.ts file.
Since each new todo will start out incomplete, we really just need to text prop to create one.
types.d.ts
interface Todo {
  text: string;
  complete: boolean;
}

type ToggleTodo = (selectedTodo: Todo) => void;

type AddTodo = (text: string) => void;
App.tsx
import React, { useState } from 'react';
import { TodoList } from './TodoList';
import { AddTodoForm } from './AddTodoForm';

const initialTodos: Todo[] = [
  {
    text: 'Walk the dog',
    complete: false,
  },
  {
    text: 'Write app',
    complete: true,
  },
];

function App() {
  const [todos, setTodos] = useState(initialTodos);

  const toggleTodo: ToggleTodo = (selectedTodo: Todo) => {
    const newTodos = todos.map((todo) => {
      if (todo === selectedTodo) {
        return {
          ...todo,
          complete: !todo.complete,
        };
      }
      return todo;
    });
    setTodos(newTodos);
  };

  const addTodo: AddTodo = (text: string) => {
    const newTodo = { text, complete: false };
    setTodos([...todos, newTodo]);
  };

  return (
    <>
      <TodoList todos={todos} toggleTodo={toggleTodo} />
      <AddTodoForm addTodo={addTodo} />
    </>
  );
}

export default App;
Again, we’ll hit a familiar compilation error at this point: AddTodoFrom doesn’t expect an addTodo prop, so the compiler barfs. Good! Let’s fix that up by adding the prop to our AddTodoForm.
import React from 'react';

interface Props {
  addTodo: AddTodo;
}

export const AddTodoForm: React.FC<Props> = ({ addTodo }) => {
  return (
    <form>
      <input type="text" />
      <button type="submit">Add Todo</button>
    </form>
  );
};
Now our compiler error is gone, but our form still doesn’t do anything. To get it to work, we’ll do a number of things:
- Maintain internal
textstate usinguseState. This will allow us to maintain the state of the new todo item’s text. - Bind
textto theinputvalue. - Set text using
setTextin the input’sonChangehandler.e.target.valuecontains the current value. - Add an
onClickhandler to the submit button to submit the typed text. - Make sure to cancel the default event of actually submitting the form.
- Add the todo using
addTodoand passing ittext. - Clearing our form by setting
textto an empty string.
import React, { useState } from 'react';

interface Props {
  addTodo: AddTodo;
}

export const AddTodoForm: React.FC<Props> = ({ addTodo }) => {
  const [text, setText] = useState('');

  return (
    <form>
      <input
        type="text"
        value={text}
        onChange={(e) => {
          setText(e.target.value);
        }}
      />
      <button
        type="submit"
        onClick={(e) => {
          e.preventDefault();
          addTodo(text);
          setText('');
        }}
      >
        Add Todo
      </button>
    </form>
  );
};
And there you have it! If you go back to the application, you should now be able to add new todo items and interact with them.
Conclusion
Thanks for following along! This should hopefully give you a nice head start on your journey to using React with Typescript to craft incredible user interfaces.


Nick Scialli is a senior UI engineer at Microsoft.