How to Test Your React App Effectively with React Testing Library
Nick Scialli
March 01, 2021
Frontend testing is hard, but React Testing Library makes it a whole lot easier.
If you have done your fair share of React frontend testing, you’ve certainly encountered the frustration of integration testing a user interface. You have a couple options:
-
Snapshot testing. You can take “snapshots” of your code in different states, save those snapshots, and consider the test “failing” if those snapshots ever change in the future. When the snapshot test does fail, you review the diff between the old and new snapshot and decide whether it’s appropriate to update your snapshot to the new one.
-
Functionality testing. You can mount your React component (usually using a tool like
jsdom), use DOM selectors to interact with the component, and make some assertions about its behavior.
The Problem with Snapshot Testing
There are some benefits to snapshot testing: I have definitely taken comfort in the fact that certain components render exactly the same despite changes I’m making in other parts of the application.
That being said, snapshots are very brittle. For example, changing a class name that doesn’t truly affect how the code renders will show as a failing test. Even worse, if you wrap a part of your app in an additional div, you’ll often get an absolutely huge diff because of the new div and change to code indentation.
I consider any failing tests that don’t truly indicate an issue to be “false positives.” You get a lot of “false positives” with snapshot testing, which can result in ignoring snapshot diffs. Before you know it, you’ll end up ignoring truly important diffs (i.e., those indicative of a breaking change) and then you begin to realize that your snapshot testing is losing its value.
The Problem with Functionality Testing
I generally like functionality testing better than snapshot testing. You can articulate a flow through a section of the application and assert that if you do x, then y will display and z will happen. But the problem with this kind of testing is that it can also be brittle.
For example: if you’re triggering x by using a CSS selector and firing a click event, your test breaks if you change that element’s class. However, the functionality of your app hasn’t changed at all. Again, this is what I would call a “false positive.”
Another problem with this kind of testing is the asynchronous nature of our applications. Waiting for elements to appear of disappear on the DOM can be tricky. You can get yourself into a situation where your tests are nondeterministic. When one test will pass one day and fail the next seemingly without reason, it can cause major frustration.
What’s Different About React Testing Library?
To be clear, React Testing Library enables you to both do snapshot and functionality testing. The major difference is that it makes it a lot easier to do the following tasks that are usually frustrating with other testing libraries:
- Select DOM elements in a non-brittle way
- Fire events
- Wait for DOM elements to load or disappear
- Do all of those things very delcaratively (i.e., the code sounds exactly like what it does)
Now that I have spent some time explaining why I’m so enthused about React Testing Library, let’s look at an example of an application and how we can test it!
A Hands-On React Testing Library Primer
To get started with React Testing Library, we’re going to clone down an existing application I made. It’s just a simple price calculator for some fictitious service.
The following gif shows its entire functionality.
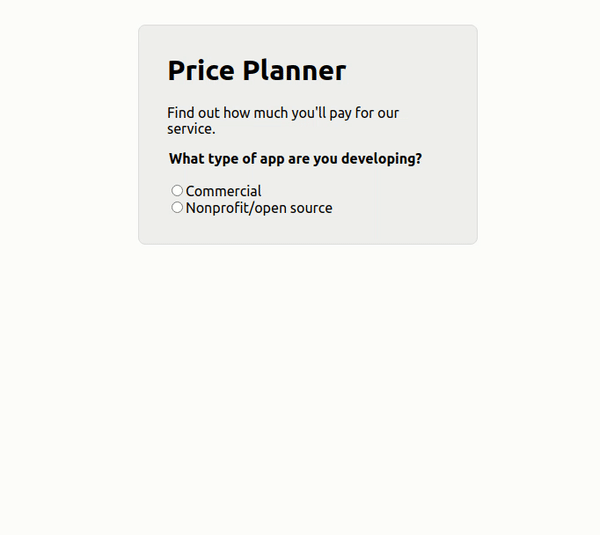
In the application, the user can select whether their product is a commercial or non-profit endeavor. If commercial, the user selects the anticipated number of users for their product using a range slider input. Finally, the user clicks a “Calculate” button, which calculates the estimated cost of the service. If the user selects nonprofit, the app displays a message telling the user that the service is free.
Getting the App Set Up Locally
Here are three quick steps to get the app set up locally. We need to do this before we can write tests for it.
Step 1: Clone down the repo
Now that we’ve seen how the app works, let’s clone down the repo so we can write tests for it.
If you’re using github with HTTPS, you can clone the repo using the following command:
git clone https://github.com/nas5w/rtl-testing-demo.gitIf you’re using github with SSH, the following should work:
git clone git@github.com:nas5w/rtl-testing-demo.gitAnd if you’re not using git, you can still download a a zip file of the code directly on github here.
Step 2: Install dependencies
Change into the new directory and install dependencies using the yarn or npm install commands.
If using yarn:
cd rtl-testing-demo
yarn
If using npm:
cd rtl-testing-demo
npm install
It should take a moment to install all the project dependencies.
Step 3: Start the app and tinker with it a bit
To start the app, run yarn start if using yarn or npm run start if using npm. Your app will now be running on port 3000, meaning you should be able to navigate to it in the browser at http://localhost:3000. Play around with it for a bit to get the feel for how it works!
Reviewing the Code
This isn’t a React tutorial, so I’m not going to go into detail about how the code works. That being said, all the important code is in the PricePlanner.tsx file.
If you don’t know Typescript, this should still be fairly straightforward to follow.
import { useState } from 'react';

type AppType = 'commercial' | 'open' | undefined;

export const PricePlanner = () => {
  const [appType, setAppType] = useState<AppType>();
  const [users, setUsers] = useState(1);
  const [price, setPrice] = useState<number>();

  return (
    <div className="planner">
      <h1>Price Planner</h1>
      <p>Find out how much you'll pay for our service.</p>
      <AppTypeSelect appType={appType} setAppType={setAppType} />
      {appType === 'commercial' && (
        <>
          <UserSelect users={users} setUsers={setUsers} />
          <button
            className="calculate"
            onClick={() => {
              fakeAsyncPricer(users).then((p) => {
                setPrice(p);
              });
            }}
          >
            Calculate
          </button>
          {price && <h2>Your estimated price is ${price}/mo.</h2>}
        </>
      )}
      {appType === 'open' && <h2>Congrats, your access is free!</h2>}
    </div>
  );
};

type AppTypeSelectProps = {
  appType: AppType;
  setAppType: (appType: AppType) => void;
};

const AppTypeSelect = ({ appType, setAppType }: AppTypeSelectProps) => {
  return (
    <div>
      <legend className="question">What type of app are you developing?</legend>
      <br />
      <div>
        <label>
          <input
            id="commercial"
            type="radio"
            checked={appType === 'commercial'}
            onChange={() => {
              setAppType('commercial');
            }}
          />
          Commercial
        </label>
        <br />
        <label>
          <input
            id="open"
            type="radio"
            checked={appType === 'open'}
            onChange={() => {
              setAppType('open');
            }}
          />
          Nonprofit/open source
        </label>
      </div>
    </div>
  );
};

type UserSelectProps = {
  users: number;
  setUsers: (users: number) => void;
};

const UserSelect = ({ users, setUsers }: UserSelectProps) => {
  return (
    <>
      <label className="question" htmlFor="users">
        How many users will your app have?
      </label>
      <br />
      <input
        type="range"
        min="1"
        max="1000"
        value={users}
        id="users"
        onChange={(e) => {
          setUsers(parseInt(e.target.value));
        }}
      />
      <br />
      <span>
        {users === 1000 ? '1,000+' : users} {users === 1 ? 'user' : 'users'}
      </span>
    </>
  );
};

const fakeAsyncPricer = (users: number) => {
  const randomDelay = Math.floor(Math.random() * 300);
  return new Promise<number>((res) => {
    setTimeout(() => {
      let price: number;
      if (users < 100) {
        price = users * 5;
      } else if (users < 300) {
        price = users * 4;
      } else if (users < 700) {
        price = users * 3;
      } else {
        price = users * 2;
      }
      res(price);
    }, randomDelay);
  });
};
We see that we have some conditional rendering that makes our app reactive. We also see that we have a fakeAsyncPricer function that fakes some kind of asynchronous operation to determine the service price. This was added so we can get a good look at how to test to DOM when async things are happening.
Writing Our Tests
Okay, we’re finally ready to write some tests with React Testing Library! Let’s create a new test file for our component. We’ll put this in our src folder.
touch src/PricePlanner.test.tsxinside this test file, let’s set up a couple different tests that we’ll want to complete:
- PricePlanner shows free price for nonprofits
- PricePlanner calculates price for commercial users
In our file, this would look as follows. I have added some comments to think through how a user would actually interact with the component. Again, the declarative nature of React Testing Library is part of the reason I like it so much.
describe('PricePlanner', () => {
  it('shows free price for nonprofits', () => {
    // Render the PricePlanner component
    // Select the nonprofit radio option
    // Assert that the screen tells the user it's free
  });
  it('calculates price for commercial users', () => {
    // Render the PricePlanner component
    // Select the commercial radio option
    // Change the slider option to 300 users
    // Click the calculate button
    // Assert that the app tells the user it will cost $900/mo
  });
});
So, let’s start filling in the blanks.
Render, Screen, and FireEvent
Three of the most important functions exported from React Testing Library are render, screen, and fireEvent.
renderwill render the JSX that’s provided to it to a node-based DOM (it usesjsdom).screenwill allow you to make all sorts of declarative selections and assertions about what’s happening in the DOM.fireEventdoes exactly what it sounds like: it lets you fire events in the DOM. For example, you can use it to click a button, change a radio, and add some input text.
The First Test
The first test is fairly straightforward because nothing asynchronous is happening. We make a radio selection and check to see that some text displays. Here’s how it looks with React Testing Library.
import React from 'react';
import { fireEvent, render, screen } from '@testing-library/react';
import { PricePlanner } from './PricePlanner';

describe('PricePlanner', () => {
  it('shows free price for nonprofits', () => {
    // Render the PricePlanner component
    render(<PricePlanner />);
    // Select the nonprofit radio option
    const nonprofitRadio = screen.getByLabelText('Nonprofit', { exact: false });
    fireEvent.click(nonprofitRadio);
    // Assert that the screen tells the user it's free
    expect(screen.getByText('free', { exact: false })).toBeInTheDocument();
  });
});
We can test this out but running yarn test (or npm run test) in our root directory.
It works! I think it reads beautifully. The standout here is that we find the nonprofit radio using screen.getByLabelText('Nonprofit', { exact: false }). The exact option tells the selector that we want a label that contains “Nonprofit” but it can have some other characters in it as well. Basically, can use a pretty minimal amount of information to get the right radio option and be fairly cetain we won’t break that selector. Even if we do, it’s a pretty easy fix.
What’s also nice about this is it helps encourage good accessibility practices: if I hadn’t properly associated the label with the radio option, this test would fail.
The simplicity of firing an event is pretty neat too. We grabbed the radio button and then simply passed it to fireEvent.click.
My assertion is a bit lazy but it does the job: basically, it asserts that there’s a node on the DOM that contains the test “free”. In this case, we can be fairly certain this would only match the case when our app successfully tells the user the service is free. We could, if necessary, be more specific with that selector.
The Second Test
The second test is more complicated due to our async price calculator. Let’s be naive for a moment and “forget” about that. We’ll write this test just like the first one.
it('calculates price for commercial users', () => {
  // Render the PricePlanner component
  render(<PricePlanner />);
  // Select the commercial radio option
  const commercialRadio = screen.getByLabelText('Commercial');
  fireEvent.click(commercialRadio);
  // Change the slider option to 300 users
  const slider = screen.getByLabelText('How many users', { exact: false });
  fireEvent.change(slider, { target: { value: 300 } });
  // Click the calculate button
  const calculateButton = screen.getByRole('button');
  fireEvent.click(calculateButton);
  // Assert that the app tells the user it will cost $900/mo
  expect(screen.getByText('$900', { exact: false })).toBeInTheDocument();
});
We can see a couple additional handy utilities here: fireEvent.change takes an event object {target: { value: "Some value" }} and changes the provided input to that value. We also notice screen.getByRole, which allows us to easily find anything that acts as a button on the page.
Let’s run this test with yarn test (or npm run test).
Oh no, it fails! Let’s take a look at what our console says.
TestingLibraryElementError: Unable to find an element with the text: $900. This could be because the text is broken up by multiple elements. In this case, you can provide a function for your text matcher to make your matcher more flexible.
That error message is partially right: the element is not on the DOM. But—it’s not because the matcher we’re using is bad. It’s because our price calculator takes some time (up to 300ms) to calculate a price and then render it to the DOM.
Our test tried to make the assertion before the DOM was ready.
Async Selectors
Fortunately, React Testing Library has abstracted away the complexity of waiting for something to appear on the DOM. Our test case only requires two minor changes.
- We should change the test case to be an
asyncfunction. This is so we can useawaitinside the function. - We can use
await screen.findByTestrather thangetByText.
As an aside, React Testing Library has a nice convention that all of the getBy* selectors are synchronous and return matched elements whereas the findBy* selectors are asynchronous and return promises.
Test Two, Take Two
With our new knowledge of async selectors, let’s fixup our test.
it('calculates price for commercial users', async () => {
  // Render the PricePlanner component
  render(<PricePlanner />);
  // Select the commercial radio option
  const commercialRadio = screen.getByLabelText('Commercial');
  fireEvent.click(commercialRadio);
  // Change the slider option to 300 users
  const slider = screen.getByLabelText('How many users', { exact: false });
  fireEvent.change(slider, { target: { value: 300 } });
  // Click the calculate button
  const calculateButton = screen.getByRole('button');
  fireEvent.click(calculateButton);
  // Assert that the app tells the user it will cost $900/mo
  expect(await screen.findByText('$900', { exact: false })).toBeInTheDocument();
});
And now if we run the test, it works!
Only Scratching the Surface
I hope you enjoyed this quick primer to React Testing Library. We have only scratched the surface, but hopefully you’re already seeing how it can a lot more declarative and robust than its alternatives.


Nick Scialli is a senior UI engineer at Microsoft.