Your First Svelte Project: A Todo List App
Nick Scialli
March 02, 2021
Today we’re going to write our first Svelte App. You guessed it—a Todo list app! Todo list app examples may be overdone, but I actually enjoy using them as a first foray into a language or framework: building the same app offers an excellent apples-to-apples comparison.
So—let’s dig in!
Getting Set Up
Install Node.js
First and foremost, you’ll need to have the node.js JavaScript runtime installed. You can install it for free here: Install node.js
To verify that you hae node installed, the following command in your terminal should report a version number:
node -vMy version is 10.18.1, but your node version will likely be different.
Create a New Project Using the Svelte Starter Template
There’s a handy Svelte starter template located here. We’re going to use this as the starting point for our app. To do so, run the following command, which will clone down all the files form the starter template into a local folder called svelte-todo-app.
npx degit sveltejs/template svelte-todo-appInstall Dependencies
Let’s change into our new directory:
cd svelte-todo-appAnd use npm to install the project’s dependencies. This will create a local node_modules folder where all the various third-party packages will be stored. It also creates a package-lock.json file, which serves to pin down the exact versions of these dependencies.
npm installRun the Starter App
Almost done with the setup process! We can run our development server by running:
npm run devYou should see something like this in your terminal:

If so, your app is now being served on port 5000. You can view it by navigating to http://localhost:5000 in a web browser. You should see the following “Hello World” application. Success!

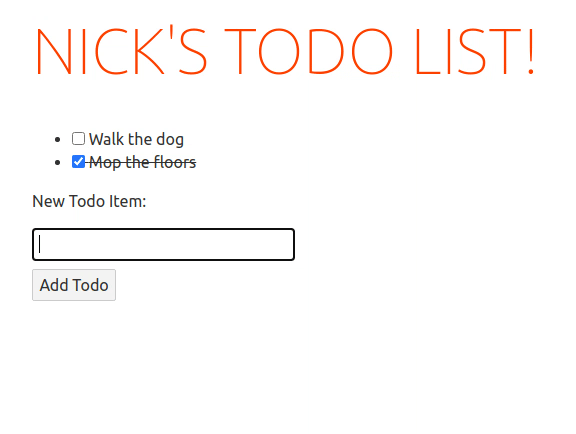
Planning Our Todo List App
As a peek ahead, we’ll be building our app based on the following mockup.

We will use a lot of the starter app’s styles and adding the following functionality:
- The ability to list any number of todos
- The ability to mark todos as complete or incomplete
- The ability to strike-through completed todos
- The ability to add new todos
Like many front-end frameworks, Svelte encourages you to develop your apps in a modular way using components. Planning ahead, we will have three components:
- A main
Appcomponent that contains the other components - A
TodoListItemscomponent, which will contain our list of todos - An
AddTodoFormcomponent, which will contain the form we will use to add new todos to our list
First Edits: Personalizing the Title
The entry point to our application is the main.js file in the src directory. (It’s a bit out of scope to discuss why main.js is the entry point to our app, but it has to do with how the starter template has been configured to build our application).
If we look at main.js, we see the following:
import App from './App.svelte';

const app = new App({
  target: document.body,
  props: {
    name: 'world',
  },
});

export default app;
This code is (1) importing an App component from the ./App.svelte file, (2) creating a new instance of the App that will be inserted into the document.body of our webpage, and (3) passing the name prop to the App component with a value of "world".
Our first edit is going to be changing the name prop to your own name. For me it’s “Nick” but please use your own name:
import App from './App.svelte';

const app = new App({
  target: document.body,
  props: {
    name: 'Nick',
  },
});

export default app;
If you are not still running the dev server, go ahead and run npm run dev in the root directory of the project. Navigate to http://localhost:5000 and you sould see the app now greeting you personally:
“Hello Nick!”
Editing the App Component
Let’s crack open the App.svelte component and see how this is working. We initially see a script tag surrounding export let name;. In Svelte, this is how you declare props for a component. It feels a bit unnatural at first to be exporting the variable like this, but you get used to it quickly!
<script>
  export let name;
</script>
After the script tag, we see some HTML. Importantly, we can see that our name prop is used in the HTML by being enclosed in curly braces:
<h1>Hello {name}!</h1>This is how we’ll be adding variables to our HTML templates.
Finally, we see a styles inside a style tag at the bottom of the page. These styles are isolated to this component, so none of the styles specified here can “leak” out and cause unwanted stying in other components.
Initial Style Updates and Ripping Out Starter Text
Let’s do some quick-and-dirty style updates and rip out some of the starter text in our App component. It should look like this when you’re done:
<script>
  export let name;
</script>

<main>
  <h1>{name}'s Todo List!</h1>
</main>

<style>
  main {
    padding: 1em;
    max-width: 40em;
    margin: 0 auto;
  }

  h1 {
    color: #ff3e00;
    text-transform: uppercase;
    font-size: 4em;
    font-weight: 100;
  }
</style>
So now it will say “Nick’s Todo List!” (or whatever your name is). We removed the starter paragraph about the Svelte docs. Finally, we simplified the styling a bit.
Creating the TodoListItems Component
Next up, we create the TodoListItems component that will contain all of our todo list item. Make a file TodoListItems.svelte inside the src folder (so it’s a peer of the App.svelte file).
In that file, we first make a list of todos in our JavaScript code (inside the script tag). Each todo will have an id, some text, and a completed boolean value.
Additionally, we make an unordered list below our script tag. We don’t exactly know how to fill this out yet.
<script>
  let todos = [
    { id: 1, text: 'Walk the dog', completed: false },
    { id: 2, text: 'Mop the floor', completed: true },
  ];
</script>

<ul>
  <li>???</li>
</ul>
We can’t just do something like we did before (i.e., try to add a variable like {todos}) because this is an array of items rather than one item.
To handle rendering arrays, Svelte gives us each blocks. The syntax ends up working out like this:
<script>
  let todos = [
    { id: 1, text: 'Walk the dog', completed: false },
    { id: 2, text: 'Mop the floor', completed: true },
  ];
</script>

<ul>
  {#each todos as todo}
  <li>{todo.text}</li>
  {/each}
</ul>
This has been a decent amount of work, so let’s add this component inside our App.svelte file so we can actually see it in our app.
<script>
  import TodoListItems from "./TodoListItems.svelte":
  export let name;
</script>

<main>
  <h1>{name}'s Todo List!</h1>
  <TodoListItems />
</main>

<style>
  main {
    padding: 1em;
    max-width: 40em;
    margin: 0 auto;
  }

  h1 {
    color: #ff3e00;
    text-transform: uppercase;
    font-size: 4em;
    font-weight: 100;
  }
</style>
We use an import statement to import the new component. Then, we add it in the correct location of our App by adding a <TodoListItems /> tag.
Assuming our app is still running in dev mode, we see our bare-bones todo list app in all its glory.

A great start!
Adding Interactivity
In our TodoListitems component, we want to be able to mark our items as complete (or incomplete). To do so, we use a checkbox. let’s get the checkbox with labels set up before we introduce how to make them interactive.
<script>
  let todos = [
    { id: 1, text: 'walk the dog', completed: false },
    { id: 2, text: 'mop the floor', completed: true },
  ];
</script>

<ul>
  {#each todos as todo}
  <li>
    <label><input type="checkbox" /> {todo.text}</label>
  </li>
  {/each}
</ul>
And this should make some sense: inside each list item we wrap our input and label text in a label HTML element.
It turns out that it’s a fairly simple process in Svelte to make this interactive. We simply need to bind the checked value of our checkbox to the completed value of the todo. Let me show you how this works.
<script>
  let todos = [
    { id: 1, text: 'walk the dog', completed: false },
    { id: 2, text: 'mop the floor', completed: true },
  ];
</script>

<ul>
  {#each todos as todo}
  <li>
    <label>
      <input type="checkbox" bind:checked="{todo.completed}" />
      {todo.text}
    </label>
  </li>
  {/each}
</ul>
If you go back to the app in our browser, you’ll see tht it just works! It turns out that this binding will change the value of the completed property in the coresponding JavaScript object, which is great: we’re going to need that to put a strike-through any completed items. Let’s do that now.
We add a completed class .completed { text-decoration: line-through } to our component and then use the class binding to conditionally add the completed class to our list items.
<script>
  let todos = [
    { id: 1, text: 'walk the dog', completed: false },
    { id: 2, text: 'mop the floor', completed: true },
  ];
</script>

<ul>
  {#each todos as todo}
  <li class:completed="{todo.completed}">
    <label>
      <input type="checkbox" bind:checked="{todo.completed}" />
      {todo.text}
    </label>
  </li>
  {/each}
</ul>

<style>
  .completed {
    text-decoration: line-through;
  }
</style>
So this sytax basically says: “this list item hass the class “completed” when todo.completed is true. Pretty clean!
Small Side Note: Using Keyed Lists
One common thread with a lot of front-end frameworks is that, when rendering arrays, we need to include some kind of key off of which the framework’s diffing algorithm can work. In Svelte’s case, we will want to include this key in our each loop. In our example, the unique key for each item in our array is the todo’s id. We specify this in parenthesis when starting our each loop. See (todo.id) in the below snippet.
<script>
  let todos = [
    { id: 1, text: 'walk the dog', completed: false },
    { id: 2, text: 'mop the floor', completed: true },
  ];
</script>

<ul>
  {#each todos as todo (todo.id)}
  <li class:completed="{todo.completed}">
    <label>
      <input type="checkbox" bind:checked="{todo.completed}" />
      {todo.text}
    </label>
  </li>
  {/each}
</ul>

<style>
  .completed {
    text-decoration: line-through;
  }
</style>
Creating the AddTodoForm Component
The final piece of our app is to be able to add todos to our todo list. We once again create another file, this time called AddTodoForm.svelte, in the src folder (the same folder as our other two components).
In this file, we create a simple form that has an textbox input and button to submit our todo. We then create a variable called text and bind it to our input since we’ll want to keep track of the value in that textbox.
<script>
  let text = '';
</script>

<div>
  <form>
    <label for="new-todo">New Todo Item:</label><br />
    <input id="new-todo" bind:value="{text}" /><br />
    <button>Add Todo</button>
  </form>
</div>
This should be fairly straightforward except for the new type of binding we are using: bind:value. This works exactly like bind:checked did in our list component: Any change to our input value will be reflected in the text variable and vice versa.
Let’s now add this component into our App.svelte component using the same process we used with our TodoListItems component: we first import it and then we place it in our HTML to be redered.
<script>
  import TodoListItems from "./TodoListItems.svelte":
  import AddTodoForm from "./AddTodoForm.svelte":
  export let name;
</script>

<main>
  <h1>{name}'s Todo List!</h1>
  <TodoListItems />
  <AddTodoForm />
</main>

<style>
  main {
    padding: 1em;
    max-width: 40em;
    margin: 0 auto;
  }

  h1 {
    color: #ff3e00;
    text-transform: uppercase;
    font-size: 4em;
    font-weight: 100;
  }
</style>
If we navigate to our app in the browser, everything looks fine. However, we notice that our form clearly doesn’t work—nothing happens when we click “Add” except for a page refresh.
Lifting Up State
So it turns out it’s pretty complicated to enable a component to alter the state of a peer component. Since our todos live in the TodoListItems component and the AddTodoForm needs to add items to this list, we currently have a problem.
The good news is the fix is relatively simple—it’s called “lifting up state.” Lifting state is the idea of lifting the shared state to the closest common anscestor. In our case, we can lift our todos up to our App component. The TodoListItems component can take these todos as a prop.
Let’s make this adjustment! First, we export let todos; from our TodoListItems component.
<script>
  export let todos;
</script>

<ul>
  {#each todos as todo (todo.id)}
  <li class:completed="{todo.completed}">
    <label>
      <input type="checkbox" bind:checked="{todo.completed}" />
      {todo.text}
    </label>
  </li>
  {/each}
</ul>

<style>
  .completed {
    text-decoration: line-through;
  }
</style>
Next, we add the todos to our App component as pass the todos as a prop to the TodoListItems component. This can be done with the syntax <TodoListItems todos={todos} />. Since the array in the App component is called todos and the prop is also called todos, we can use a nice shorthand: <TodoListItems {todos} />.
<script>
  import AddTodoForm from './AddTodoForm.svelte';
  import TodoListItems from './TodoListItems.svelte';

  export let name;
  let todos = [
    { id: 1, text: 'Walk the dog', completed: false },
    { id: 2, text: 'Mop the floors', completed: true },
  ];
</script>

<main>
  <h1>{name}'s Todo List!</h1>
  <TodoListItems {todos} />
  <AddTodoForm />
</main>

<style>
  main {
    padding: 1em;
    max-width: 40em;
    margin: 0 auto;
  }

  h1 {
    color: #ff3e00;
    text-transform: uppercase;
    font-size: 4em;
    font-weight: 100;
  }
</style>
With this kind of refactor, we need to make sure our app still works as it did. If we load it up in the browser, we can see that indeed it does.
Adding a Todo
Now that our todos live in the App component, we can create a function in the App component that takes the text of a new todo and adds it to our array.
Importantly, We want to create a new array and assign that to todos rather than just pushing an object onto the existing todos array. This is because, like other frameworks, Svelte operates on referential equality and will only consider todos updated if it references a totally new array.
<script>
  import AddTodoForm from './AddTodoForm.svelte';
  import TodoListItems from './TodoListItems.svelte';

  export let name;
  let todos = [
    { id: 1, text: 'Walk the dog', completed: false },
    { id: 2, text: 'Mop the floors', completed: true },
  ];

  function addTodo(text) {
    // Create an ID that's 1 more than the current largest
    const id = Math.max(...todos.map(({ id }) => id)) + 1;
    todos = [...todos, { id, text, completed: false }];
  }
</script>

<main>
  <h1>{name}'s Todo List!</h1>
  <TodoListItems {todos} />
  <AddTodoForm {addTodo} />
</main>

<style>
  main {
    padding: 1em;
    max-width: 40em;
    margin: 0 auto;
  }

  h1 {
    color: #ff3e00;
    text-transform: uppercase;
    font-size: 4em;
    font-weight: 100;
  }
</style>
Notice that I also passed addTodo as a prop to the AddTodoForm component. This is because our AddTodoForm is going to use this function to modify the todos list. Let’s update our AddTodoForm to make this work.
<script>
  export let addTodo;
  let text = "";
</script>

<div>
  <form
    on:submit={(e) => {
      e.preventDefault();
      if (text.trim() !== 0) {
        addTodo(text);
        text = "";
      }
    }}
  >
    <label for="new-todo">New Todo Item:</label><br />
    <input id="new-todo" bind:value={text} /><br />
    <button>Add Todo</button>
  </form>
</div>
We export addTodo, which makes it a prop. we use a new on:submit directive to our form that handles the submit event. It does a few things:
- Prevents the default action of posting the form data (which causes the page refresh)
- Makes sure our textbox isn’t empty
- Passes the
textto ouraddTodofunction - Resets
textto a blank string so future todos can be added
That’s Actually All the Functionality
Believe it or not, that’s all we have to do in Svelte. We can tinker around with our application and see that we’re able to add todos and indicate them as complete or incomplete.
Conclusion
Svelte feels like one of the lower friction frameworks I have encountered in a while! It was really easy to get a todo list app up and running. I hope you’re looking forward to digging in deeper in future tutorials!


Nick Scialli is a senior UI engineer at Microsoft.