Learn Solid.js and build a todo list app
Nick Scialli
February 19, 2022
![]()
Solid.js is a front-end framework that has been getting a lot of hype recently—and for good reason. On the surface, Solid looks similar to React, but its core mechanics are quite different. These differences make Solid blazingly fast and, in my opinion, less prone to some of the errors that plague React apps.
In this post, I’ll show you how to build a todo list app with Solid and explain some of the mechanics along the way. Why a todo list? Well, because you’ve probably made 100 of these and know exactly what goes into making one—leaving the framework itself as the only “unknown.”
Mocking up our app
First, we’ll mock up our application. The following mock-up shows three parts of our application:
- TodoList
- TodoListItem
- AddTodoForm

We can see that we have a checkbox to toggle whether an item is done or not. When the item is done, there’s a line through it. We’re also able to add new items using a textbox with an “Add” button.
Before we dive directly into the app, let’s get our local development environment working and go through some Solid basics.
Getting started with Solid
The easiest way to get started with Solid is to use one of their starter templates. Assuming you have node installed, run the following command in your terminal to download the Solid/JavaScript/Vite template into a directory called solid-todo-list:
npx degit solidjs/templates/js solid-todo-listNext, change into the new directory, install the dependencies, and start the app.
cd solid-todo-list
npm i
npm run dev
If you navigate to http://localhost:3000, you should see a default Solid app running (yes, this is a play on the default create-react-app starter):

Some Solid principles
Inside our app directory, open up src/App.jsx in your development environment of choice. It’s JSX, which you’ll be pretty familiar with if you’ve used React.
Let’s delete everything in this file, and replace it with some Hello World text.
App.jsx
function App() {
  return (
    <div>
      <h1>Hello world!</h1>
    </div>
  );
}

export default App;
If we save this and go back to http://localhost:3000, we’ll see that Vite has helpfully updated our app in realtime using hot module replacement.
Next, let’s add a variable to the equation. Declare your name outside the function scope and greet yourself like this:
const name = 'Nick';

function App() {
  return (
    <div>
      <h1>Hello {name}!</h1>
    </div>
  );
}

export default App;
If you go back to the app, you should see yourself being greeted. Great!
If you’re used to React, you’re probably thinking “this all looks very similar.” And it is! Solid uses a lot of what’s great about React, including JSX.
But things are about to start getting different.
Let’s add a stateful variable: a count.
We can do this using createSignal, which may remind you of useState if you’re coming from React-land.
import { createSignal } from 'solid-js';

function App() {
  const [count, setCount] = createSignal(0);

  return (
    <div>
      <h1>The count: {count()}</h1>
    </div>
  );
}

export default App;
This may look familiar, but you’re wondering why count is a function. We’ll talk about this shortly!
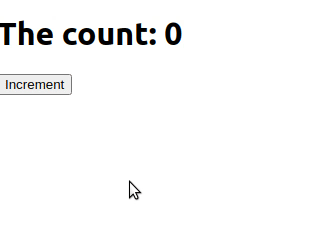
If we go back to our application, we see that our count is 0. This makes sense—we never update it. Let’s add a button that allows us to do so.
import { createSignal } from 'solid-js';

function App() {
  const [count, setCount] = createSignal(0);

  return (
    <div>
      <h1>The count: {count()}</h1>
      <button
        onClick={() => {
          setCount(count() + 1);
        }}
      >
        Increment
      </button>
    </div>
  );
}

export default App;
When we go back to the app, we see that we can now increment the count by clicking the “Increment” button. To accomplish this, button has an onClick handler inside of which we use the setCount function given to us by createSignal.
Granular reactivity
This is where things start getting pretty cool. Despite incrementing the count, we’re actually not re-running the App function. We can prove this by adding a console.count inside the function body:
import { createSignal } from 'solid-js';

function App() {
  const [count, setCount] = createSignal(0);

  console.count('here');

  return (
    <div>
      <h1>The count: {count()}</h1>
      <button
        onClick={() => {
          setCount(count() + 1);
        }}
      >
        Increment
      </button>
    </div>
  );
}

export default App;
No matter how many times we click the “Increment” button, all we see in the console is:
here: 1So what’s going on here? It’s related to why our count variable is being called. When count is called, Solid knows that the component in which count is called should subscribe to any changes to count. This is happening at a very low level: there is no virtual DOM reconciliation, Solid is directly updating the DOM element that’s subscribed to the count value.
This can be confusing for React developers that may be inclined to rely on the App function body to re-run, but Solid’s model has a lot of benefits.
For one, we don’t have to worry about weird effects and concerns over infinite loops due to continuously re-running a component function. If you’re a React developer, the following code might terrify you. But it’s perfectly fine in Solid!
import { createSignal } from 'solid-js';

function App() {
  const [count, setCount] = createSignal(0);

  setInterval(() => {
    setCount(count() + 1);
  }, 1000);

  return (
    <div>
      <h1>The count: {count()}</h1>
    </div>
  );
}

export default App;
If that blows your mind, then you probably won’t believe this:
import { createSignal } from 'solid-js';

const [count, setCount] = createSignal(0);

setInterval(() => {
  setCount(count() + 1);
}, 1000);

function App() {
  return (
    <div>
      <h1>The count: {count()}</h1>
    </div>
  );
}

export default App;
And it still works! The signal created by createSignal doesn’t really belong to a component and it doesn’t need tobe scoped to one. Solid still knows that the text incremented in our header needs to subscribe to count, and that’s that.
Effects
Solid has effects that can run when a variable that effect depends on is updated. Now here’s the really cool part: the same mechanics that allow low-level reactivity also make it so we don’t have to declare dependencies for effects—they just know!
import { createSignal, createEffect } from 'solid-js';

const [count, setCount] = createSignal(0);

setInterval(() => {
  setCount(count() + 1);
}, 1000);

createEffect(() => {
  console.log(count());
});

function App() {
  return (
    <div>
      <h1>The count: {count()}</h1>
    </div>
  );
}

export default App;
And we’ll log the count every time it’s updated—with no dependency arrays necessary!
Organizing components
Much like React, we generally don’t stuff all our code in a single component: we stitch multiple together. Using our contrived counter example, we might have a separate Counter component to contain the number that increments:
import { createSignal } from 'solid-js';

function App() {
  const [count, setCount] = createSignal(0);

  setInterval(() => {
    setCount(count() + 1);
  }, 1000);

  return (
    <div>
      <h1>
        The count: <Counter count={count()} />
      </h1>
    </div>
  );
}

function Counter(props) {
  return <span>{props.count}</span>;
}

export default App;
Beware the metaprogramming
Nothing’s free. This is also true for Solid.js. Solid is so efficient because it intercepts count’s getter and can update the span component. However, you can accidentally access the getter too early and end up failing to have a DOM element subscribe to the signal as desired. Consider the following, seemingly-similar code:
import { createSignal } from 'solid-js';

function App() {
  const [count, setCount] = createSignal(0);

  setInterval(() => {
    setCount(count() + 1);
  }, 1000);

  return (
    <div>
      <h1>
        The count: <Counter count={count()} />
      </h1>
    </div>
  );
}

function Counter({ count }) {
  return <span>{count}</span>;
}

export default App;
…and the counter no longer works. But why? well it turns out that, when we destructured props in the Counter function call, we called the getter on props.count to assign to a function-scoped count variable. Our function body only runs once, and so therefore our the count we are inserting into the span is only ever 0.
The todo list app
Back to our project at hand, let’s start creating that todo list app. Let’s start bottom-up, making the TodoListItem first. We’ll create a new file next to App.jsx called TodoListItem.jsx:
TodoListItem.jsx
export function TodoListItem(props) {
  return (
    <li
      style={{
        'text-decoration': props.todo.complete ? 'line-through' : undefined,
      }}
    >
      <label>
        <input type="checkbox" checked={props.todo.complete} />
        {props.todo.text}
      </label>
    </li>
  );
}
We see that we condition the “line-through” stype of our list-item based on whether props.todo.complete is true. We additionally set the checked property of the input based on this value. Finally, we display props.todo.text next to he checkbox.
Let’s now import this component into our App and create an initial, two-item array of todos. We’ll manually pass these props to a couple TodoListItem components.
import { createSignal } from 'solid-js';
import { TodoListItem } from './TodoListItem';
function App() {
const [todos, setTodos] = createSignal([
{ text: 'Walk the dog', complete: false },
{ text: 'Do homework', complete: true },
]);
return (
<ul>
<TodoListItem todo={todos()[0]} />
<TodoListItem todo={todos()[1]} />
</ul>
);
}
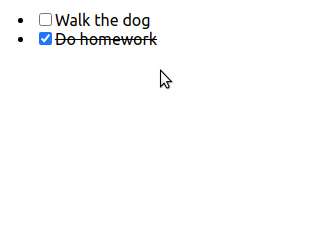
export default App;Now if we go to http://localhost:3000, we can see a couple items on our list. Progress!

Handling arrays
We can’t manually list items in an array that’s going to change lengths over time. If you’re used to React, you might think we should map over the todos(). This would work, but it’s not idiomatic Solid. This is because the entire array would re-render whenever todos() is updated, but we want (and can get) a much lower level of granularity.
Instead, Solid exports a For component that makes this simple for us:
function App() {
  const [todos, setTodos] = createSignal([
    { text: 'Walk the dog', complete: false },
    { text: 'Do homework', complete: true },
  ]);

  return (
    <ul>
      <For each={todos()}>{(todo) => <TodoListItem todo={todo} />}</For>
    </ul>
  );
}
And now we can iterate over any number of ites and any changes will only cause re-rendering within the affected element. Pretty cool!
Setting state
In our TodoListItem component, we need to be able to toggle the completeness of an item. We can do his by passing setTodos to the TodoListItem component and then calling it in the input onChange handler.
App.jsx
function App() {
  const [todos, setTodos] = createSignal([
    { text: 'Walk the dog', complete: false },
    { text: 'Do homework', complete: true },
  ]);

  return (
    <ul>
      <For each={todos()}>
        {(todo) => <TodoListItem todo={todo} setTodos={setTodos} />}
      </For>
    </ul>
  );
}
TodoListItem.jsx
export function TodoListItem(props) {
  return (
    <li
      style={{
        'text-decoration': props.todo.complete ? 'line-through' : undefined,
      }}
    >
      <label>
        <input
          type="checkbox"
          checked={props.todo.complete}
          onChange={() => {
            props.setTodos((todos) => {
              const newTodos = todos.map((todo) =>
                props.todo === todo
                  ? { ...todo, complete: !todo.complete }
                  : todo
              );
              return newTodos;
            });
          }}
        />
        {props.todo.text}
      </label>
    </li>
  );
}
Note that setTodos can take a callback function, which allows you to access the current todos array and return a new version. In this case, we map over the todos array, flip the complete prop of the correct todo, and then return a new array.
Building out the AddTodoForm
The final piece of the puzzle is the AddTodoForm. We’ll need to maintain a local signal to capture the new todo value. We’ll make sure to pass setTodos as a prop so that we can add a new todo when the Add button is clicked.
export function AddTodoForm(props) {
  const [newTodo, setNewTodo] = createSignal('');

  return (
    <form>
      <input
        value={newTodo()}
        onChange={(e) => {
          setNewTodo(e.target.value);
        }}
      />
      <button
        type="submit"
        onClick={(e) => {
          e.preventDefault();
          props.setTodos((todos) => {
            return [...todos, { text: newTodo(), complete: false }];
          });
          setNewTodo('');
        }}
      >
        Add
      </button>
    </form>
  );
}
And we can add this component to our App like so:
App.jsx
import { createSignal, For } from 'solid-js';
import { AddTodoForm } from './AddTodoForm';
import { TodoListItem } from './TodoListItem';

function App() {
  const [todos, setTodos] = createSignal([
    { text: 'Walk the dog', complete: false },
    { text: 'Do homework', complete: true },
  ]);

  return (
    <div>
      <ul>
        <For each={todos()}>
          {(todo) => <TodoListItem todo={todo} setTodos={setTodos} />}
        </For>
      </ul>
      <AddTodoForm setTodos={setTodos} />
    </div>
  );
}

export default App;
Now we navigate over to http://localhost:3000:

And we’re finished! Pretty cool. If you’d like some more practice, consider trying to add a TodoList component so that the App component doesn’t have to see the ul implementation.
Conclusion
I hope you enjoyed diving into this framework with me. If you’re coming from the React world, you probably already see the promise of granular reactivity and not having to declare dependencies. I’m pretty excited to see where this framework goes!


Nick Scialli is a senior UI engineer at Microsoft.